
Review – Creality Ender 3 v4.2.7 Motherboard

One thing I’ve praised quite a few times about the Ender 3 is how much it can be upgraded. There’s no end of bits you can buy to either replace original components or add extra features. There’s one caveat, though – if you bought one that was made before December 2020 it came with an 8-bit motherboard. There’s nothing wrong with the 8-bit motherboard, but it’s a bit limited in terms of extra connectors, so some upgrades won’t work with it. Unfortunately that includes some very useful upgrades, like self-levelling systems.
Luckily there’s a solution. Newer Ender 3s come with a much more capable 32-bit board, which also includes a dedicated connector for a BL Touch self-levelling sensor or Creality’s own CR Touch version. It has updated stepper drivers that run the motors quieter and should give improved print quality. It also has a built-in bootstrap loader to simplify the process of updating firmware. If your Ender 3 doesn’t already have a 32-bit motherboard this is a really worthwhile upgrade. To see how difficult it is, we decided to upgrade our existing motherboard to the Creality Ender 3 v4.2.7 motherboard.
What’s In The Box?
Well, this is a simple one. All that’s in the neat, well-protected little box is a small motherboard – and yes, it is small. OK, there’s also a simple leaflet showing you what all the connections are for, but that’s it. The motherboard is all you get, and also all you need. There’s no other hardware required to install it except the tools that came with the Ender 3.
So How Hard Is It?
Installing a new motherboard means completely stripping down the Ender 3’s electronics box. Start by unplugging the printer and removing the two screws either side of the box’s cooling fan. This is easy enough of you push the bed to the rear (I removed the bed so I could take photos – you don’t need to). Now push the bed forward and take out the single screw at the rear. Lift the top off the box to reveal the motherboard.
Start by removing the cables to the stepper motors, which are plugged in down the right side of the board, and the multicoloured ribbon cable at the front which connects the control panel. Getting these out the way will give you a clearer view of the rest. Unplug the cooling fan. Now look at the front left of the board. There are two identical white plugs that connect the 3D printer’s temperature sensors, and these have to be connected to the right place on the new board. Unfortunately they’re, as I said, identical, so mark one with a permanent marker or piece of tape before unplugging them so you know which is which.
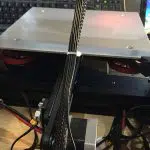
Now you’re left with two connector blocks at the rear left, which have a total of eight cables attached to them with screws. Take a photo before touching this, so you know where everything goes. Then take out the two screws that hold the motherboard to the case, and just lift it out.
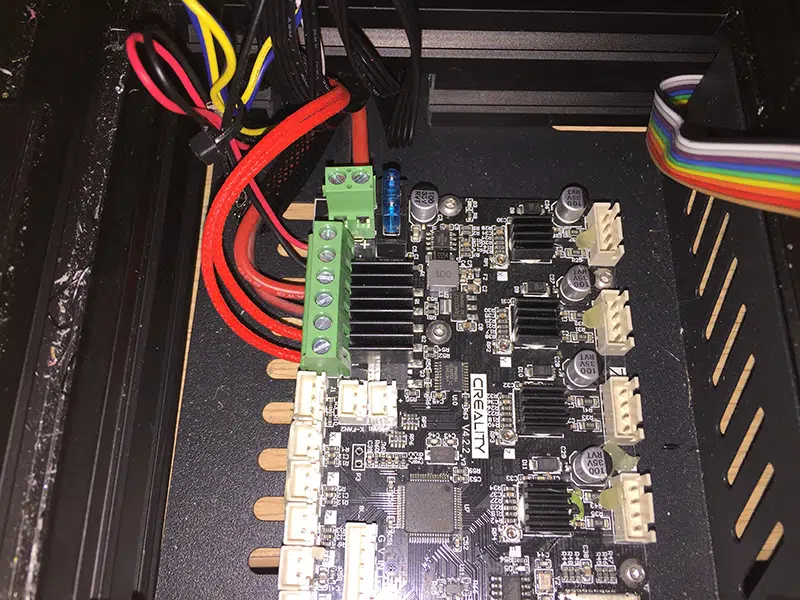
Take a photo before you remove these wires!
Installing The New Creality Ender 3 v4.2.7 Motherboard
The natural thing to do now is unpack the new motherboard and screw it down where the old one was. Resist this temptation, because if you install the new board at this point you’re never going to get all those wires into the connector blocks. Instead, loosen off all the screws and connect the wires in the same positions as they were on the old board. The wires are mostly different colours and sizes (there are two identical red braided ones, but it doesn’t seem to matter if you reverse them), so as long as you have a photo to refer to you shouldn’t have any issues there. Once all eight are firmly connected, screw the board down using the screws you removed from the old one.
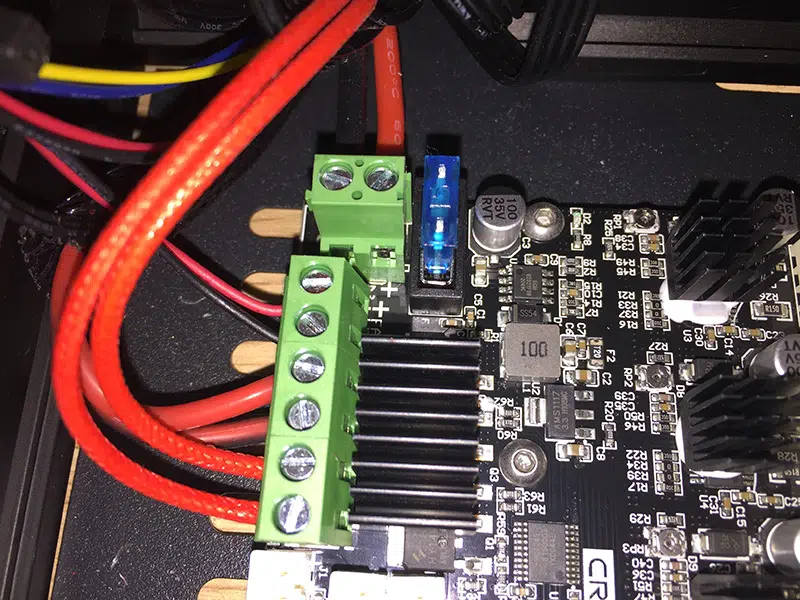
The new board, with all the wires in the right places.
Now simply plug all the connectors into the appropriate sockets on the board. Do yourself a favour and check all the connectors first. The plastic sockets aren’t glued to the board; they just slip over the pins. I found that a couple of them had come off the old board and were still on the connectors, which obviously meant they wouldn’t fit into the sockets on the new board. Once you have everything connected just screw the top back onto the electronics box, and you should be ready to go.
Optional Extras
Now you have a 32-bit board in your 3D printer you can add some extras. The big connectivity upgrade with the 32-bit boards is that socket for an auto-levelling system – and we have one of those; I’m planning to install it this weekend. The other thing that caught my eye is a touch-screen control panel, and I tried to install one of those too. The only problem is that it doesn’t work. I think that’s a firmware issue, because the panel powered up OK and let me go through all the menus; it just won’t launch a print job. I plan to have another attempt at getting it running soon, but for now I’ve gone back to the standard control panel just so I can give the board a test.
How Does It Perform?
My Ender 3 actually came with a reasonably modern v4.2.2 board, so I didn’t expect a huge difference with the v4.2.7. Well, I was wrong. The new Creality Ender 3 v4.2.7 motherboard was advertised as a silent one, and it turns out that was no exaggeration. I assume the stepper drivers have been updated, because the loudest thing about the printer is now the cooling fans. Before, the steppers made a significant amount of noise; now I have to look at it to see if it’s printing, because the fans drown out the sound of the steppers running. I also left out the TL smoothers I fitted awhile ago, and it looks like they’re no longer needed, because I’m getting very crisp prints with no sign of salmon skin.
The Verdict
If your Ender 3 has an old 8-bit board, the v4.2.7 board is a must-have upgrade. I don’t think there was ever any doubt about that. Based on my own experience – and this did surprise me – is that it’s probably a worthwhile upgrade over the v4.2.2 board as well. That’s a much smaller step up and you won’t gain connectivity options, but the reduced noise and improved print quality are definitely nice to have.
One final point for 8-bit owners is the ease of updating the firmware with the v4.2.7. There’s no need to mess around with an Arduino anymore; the boards come with a bootloader built in, so all you have to do is format a TF card, go to Creality’s download page, grab the firmware you need and load it onto the card. Then stick the card into the 3D printer and turn it on; it will automatically update. That alone makes this board worth having.


Leave a comment
You must be logged in to post a comment.