
How Is Our Ender 5 S1 Doing?

As all our regular readers will know, we got our hands on a Creality Ender 5 S1 a couple of months ago. Last month I wrote a review on it, but since then I’ve been using it a lot, and I thought I’d give an update on my experiences with it. So here we go; you’ve had my initial impressions of it, so let’s take a bit of a deeper dive.
It Just Works
This is a very low-maintenance 3D printer. As long as you put a couple of drops of oil on the Z axis drive screws every week or so, and protect it from dust, it just keeps running. Thanks to Creality Slicer’s habit of adding its auto-levelling routine to the start of every job, I haven’t bothered manually levelling the bed since I initially set it up. The Ender 5 S1 doesn’t care; it simply levels itself and prints a perfect first layer every time. If you can think of better things to do than twiddling adjustment wheels while you drag sheets of paper around the build plate, you’ll love this printer.
It’s very tidy for a 3D printer, too. Our Ender 3, bless its little hard-working socks, does tend to throw fragments of filament around. Any stray drips or tangles end up on the build plate, and because the build plate is shuttling busily back and forwards as it prints they then get thrown off into the enclosure – or, usually, into the lower parts of the printer. The Ender 5 doesn’t do that. The build plate barely moves at all; all it does is drop a fraction of a millimetre down the Z axis every time the head finishes another layer. If the hot end produces any debris, it just stays on the build plate where it’s easy to tidy up at the end of the job. Even if anything does fall off the plate, it doesn’t matter. The bottom of the printer, with that big, flat-topped enclosure, is a very uncluttered design that can be effortlessly cleaned with a soft brush. Creality have put a lot of attention to detail into the S1 version, including neat touches like putting covers on the X-axis V-wheels to keep debris out of them, but I haven’t seen so much as a speck of filament on the covers – and I’ve had it running more or less all the time I’ve been awake since I put it together.
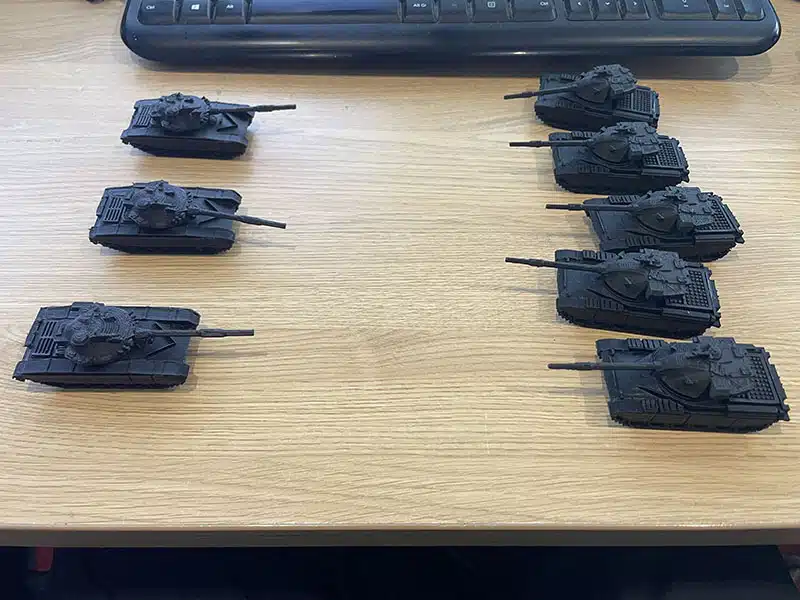
I also inadvertently tested the capabilities of the filament break sensor and the 5 S1’s pause/resume function. I recently decided that what my desk needs to make it the perfect working environment is a platoon of small plastic Chieftain tanks. Halfway through printing the last tank’s hull, and while I was distracted with something else, the filament ran out. When I got back to the office the 3D printer was waiting patiently for me to load a new spool. Then, when I’d done that and told it to resume printing, it just whirred back into life and flawlessly completed the job.
It Works Fast
I haven’t been trying to push the speed to the limit yet, but even using the default speed settings in Creality Slicer I’m seeing a dramatic improvement over the Ender 3. I like to print giant Benchies; at standard quality (0.2mm layers) on the Ender 3, one of these takes eight hours and five minutes to print. On the Ender 5 S1 that’s slashed to four hours and 53 minutes. There’s absolutely no loss of quality, either. Quite the opposite, in fact. A giant Benchy printed on the 5 S1 comes out flawless apart from a couple of tiny rough spots inside the top of the door arches, and those can be cleaned up in 30 seconds with a round file.

If you’re printing large projects, or you’re in a rapid prototyping cycle and want to minimise waiting time between iterations of your design, the extra speed is very welcome. For me, it let me quickly print a platoon of small plastic T-72s for the Chieftains to fight when I get bored. Actually if you do tabletop wargaming this 3D printer would be a great, and fast, way to build an army much more cheaply than buying Airfix kits – and there are plenty of military vehicle models on Thingiverse. In the meantime, if you want to buy some small T-72s I know just the person to talk to.
It Prints Nylon
Nylon is a great material for 3D printing. It doesn’t biodegrade like PLA does, it’s temperature-resistant, it can resist lots of chemicals that will happily dissolve other plastics and it’s very, very strong. Unfortunately, it’s also horrible to print. It won’t stick to the build plate unless you nail it down and, even with the Ender 3’s hot end pushed to its maximum temperature, it didn’t really want to melt the stuff.
Well, the Ender 5 S1 will melt it. The horrible substance still didn’t want to stick to the build plate, but cranking the bed temperature up to 90°C and adding a generous coating of 3DLac sorted that out. It still isn’t the most pleasant stuff to work with, and the print quality isn’t quite up to what this 3D printer will produce with PLA, but while the Ender 3 will – just – produce strong but rough nylon components, the Ender 5 S1 will reliably turn out much better-looking, and equally strong, ones.
I still have some polycarbonate filament in my store, although I need to spend an hour or two untangling it because right now it looks like kittens have been playing with it, and I’m planning to try printing with that soon. I’m quite excited about this because, while PC is even more borderline in the Ender 3 than nylon, the 5 S1 is a much more capable 3D printer. If it handles this ultra-finicky material as well as I expect it to, this would be a really good machine for anyone who needs to make small runs of polycarbonate components.
It’s Easy To Use
It just is. Everything about it is simple. From the clear, well laid out touch-screen interface to the self-levelling system to how effortless it is to feed filament into the extruder, Creality have done an amazing job of making the Ender 5 S1 user-friendly. Like I said before, I’ve been using it a lot over the last few weeks, and it’s been a pleasure. As great as the Ender 3 is, it does need more maintenance and tweaking than its big brother. I don’t mind that at all, because I love tinkering with things, but if you just want a 3D printer that will reliably deliver high-quality prints at a very respectable speed, the Creality Ender 5 S1 is an excellent choice. I’m really pleased with how it’s performing so far.
My next project with the Ender 5 S1 will be setting it up to work with one of Creality’s new Sonic Pad control systems. This is a really smart-looking tablet-style device and I’m even more excited about it than I am about the polycarbonate. Check back soon for a review of the Sonic Pad!


Leave a comment
You must be logged in to post a comment.