
3D Printing Tips – Fixing Elephant’s Foot

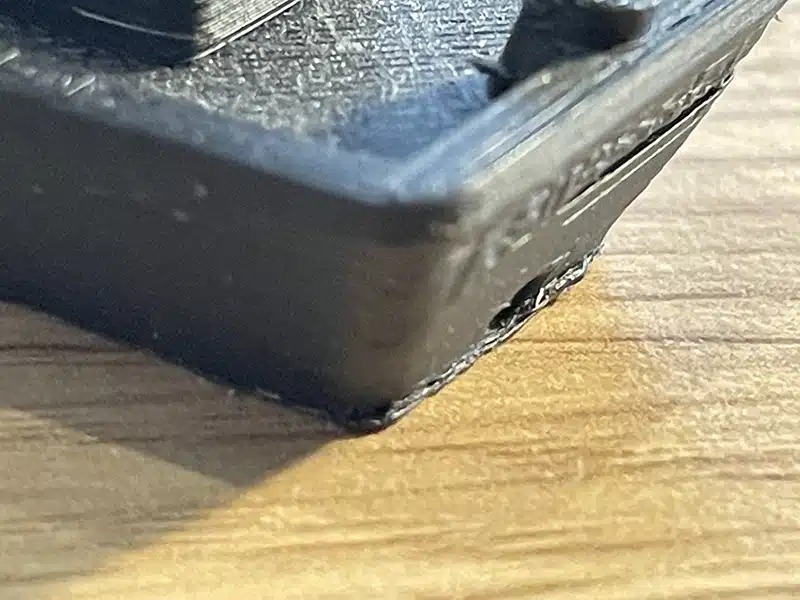
If you’ve been 3D printing for any length of time, the chances are you’ve encountered the dreaded elephant’s foot problem. Just in case you don’t know what that is, it’s when the lower layers of your print bulge out. For pretty much any 3D-printed object, this looks untidy. For anything with screw holes or other mechanical connections it’s a serious problem, needing either some serious post-processing to get things fitting properly or, more likely, a second attempt in the hope the print will come out properly this time. The problem is, it isn’t likely to come out properly unless you fix the issues that caused the problem the first time.
So What Causes Elephant’s Foot?
Elephant’s foot happens when the bottom layers of the print are squeezed under the layers above, and relieve the pressure by flowing out to the sides. This can happen for a couple of reasons. The most common is if your bed isn’t correctly levelled and the nozzle is too close to it. The first layer will usually spread out a bit, then the next layers will be forced down on top, re-melting and spreading the bottom ones. Eventually the squashing process creates enough slack in the system to even things out, and normal printing resumes, but by that time you have the dreaded effect.
Another common cause is your print simply settling under its own weight. No, 3D prints aren’t usually very heavy, but if the lower layers are still semi-molten it doesn’t take much force to spread them out. If your print bed temperature is set too high, or the nozzle cooling fan is too slow, the lower layers can stay soft for a surprisingly long time – long enough for the weight of subsequent layers to squash them.
Over-extrusion can also cause elephant’s foot. If your bed’s levelled and there’s enough cooling, but you’re still getting elephant’s foot, your printer could simply be squeezing so much plastic out the nozzle that some of it has to go sideways.
How Can You Fix It?
If you’re suffering from this annoying problem, the first thing to do is check that your bed is properly levelled. A sheet of normal printer paper should fit between the bed and nozzle with only slight resistance. If the paper binds or tears when you try to move it around, the bed is too high and the nozzle is going to be ploughing through the previous layer of filament, spreading it out.
If you’re sure the bed is properly levelled but the problem is still occurring, it’s time to look at your bed temperature. For a long time I just lazily left the Ender 3’s bed at the default 50°C Cura likes, but it turns out you can drop it to 35° with no major effect on adhesion, and that will let the lower layers cool more quickly.
You can also try tweaking your fan speed. By default, Cura doesn’t turn on the print head fan until the fourth layer. Especially combined with a high bed temperature, that can give the base of your print plenty time to start spreading out. If you look in the Cooling section of Cura’s menu you can adjust the settings. Try setting its initial speed to 25% or 50%, instead of 0, and see if that helps.
Finally, if your prints are still coming out with a hint of pachyderm’s paws at the bottom, go into your 3D printer’s settings and turn the extrusion rate down a couple of notches. Play around with that and look for a speed that solves elephant’s foot at the bottom without causing under-extrusion issues further up the print.
The elephant’s foot problem is annoying, especially if you’re 3D printing components that rely on dimensional accuracy. It’s definitely fixable, though. Like most 3D printer issues it just comes down to knowing what settings to fiddle with.


Leave a comment
You must be logged in to post a comment.