
3D Printing techniques – The basics of supports

A 3D PRINTER CAN CREATE ITS OWN SCAFFOLDING AS IT WORKS
Printing 3D objects isn’t always as simple as designing a model and sending it to your printer. It can be, but a lot of that depends on the shapes you want to print. The process of building up an object layer by layer offers unique possibilities that can’t be matched by any other manufacturing process, but it also has unique challenges.
Imagine you want to print a horse. You design your model in a suitable 3D package, process it and send it to the printer, then sit back to watch it take shape. At first everything goes perfectly. The print head lays down the first layer – four small blobs on the work area. As more layers are added these blobs become hooves, then lower legs. Slowly the legs grow, and in your mind you can see your horse taking shape.
Then the printer reaches the tip of its tail.
The horse’s tail is hanging down behind the horse, because that’s what horse’s tails do, and when the print head extrudes the first drop of plastic to make its tip the problem emerges. That drop can’t hang suspended in the air, so it just falls to the print bed. Meanwhile the head keeps moving, extending the legs by another layer, then tries to add the next layer to the tail. That falls too. You’re not going to end up with a tailless horse though, because long before that you’ll realise what’s going to happen when the print head gets to the horse’s belly, and you’ll stop the process.
A 3D printer can’t handle parts of an object that would be solidly attached when it’s finished, but are hanging in mid-air at an earlier stage. They often can’t create overhangs either, depending on how wide and steep they are and the exact material you’re printing with. Anything the head lays down that isn’t properly supported is just going to fall straight to the table.
Don’t panic though; this doesn’t mean you can only print pyramids. You can’t build a stone arch from the ground up either, but builders have still been making them for thousands of years. The trick is to use a temporary support structure. For an arch this is wooden scaffolding, which holds the stones in the right place until the keystone is fitted and they can support their own weight. With a 3D-printed object you can add supports that hold everything where it’s supposed to be, then remove them when it’s finished.
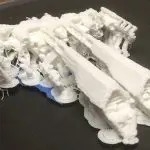
Let’s go back to the horse. Instead of just laying down its hoof prints in the first layer you need to design in 3D printing supports. These can often be quite narrow; you can build in some overhang at each layer, and over hundreds of layers it adds up. So as you create your model add a support pillar that will hold the tail as it’s printed. The horse’s body will need at least one, and probably more. Add another for the head. Now your horse will begin with eight or ten blobs, but as it rises layer by layer these will gradually join together into a single object. When it’s done the supports can be cut or broken off, leaving a perfect model horse.
There are other solutions to complex shapes; for example you can print a series of simple shapes, which fit together after printing. Sooner or later you’ll need to use supports though, so it’s a good idea to start experimenting with them early in your 3D printing journey – and we’ll return to it on this blog, too.


Leave a comment
You must be logged in to post a comment.