
Ender 3 Extruder Upgrade

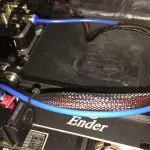
Last week I upgraded the Bowden tube on our 3D printer and mentioned that up next would likely be an all-metal extruder upgrade. Well, at 3D Printing UK we don’t hang about, so here it is!
I’ve just got my hands on a Redrex all-metal extruder. This is a straight replacement for the original plastic one that comes with the Ender 3 and a range of other printers, and comes as a kit that according to the makers can be assembled in less than two minutes. That’s a bold claim. Does it live up to it?
What’s In The Box?
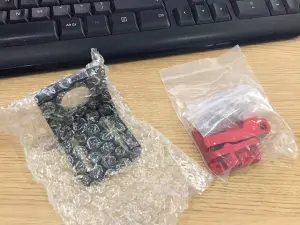
The kit arrived in a small plastic bag which contained a very solid steel mounting bracket (which I didn’t actually need) and an even smaller bag filled with extruder parts. The first thing to say is that this kit takes a minimalist approach to pre-assembly; there isn’t any. You get all the parts and a small but useful instruction leaflet, but you have to build the whole thing yourself.
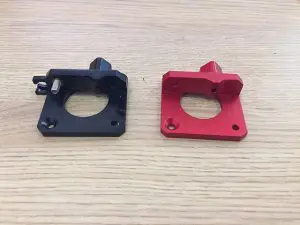
Luckily, that isn’t too difficult. You might have to do some brainwork at the start, because the kit is designed to fit several different printers and that means the instructions don’t cover every possibility, but if you have a good look at the original extruder before removing it you should be fine – it has basically the same parts, fitting together in the same way and doing the same things.
The quality of the actual parts is impressive. The main components are the extruder base and feed arm. These are machined aluminium with a deep red anodised finish. Fit of parts is very good. My main gripe is that all the screws are loose in the bag, so you need to work out which one is which. As there are three different types of M3x10mm screws in there, that isn’t a lot of fun.
Assembling The Extruder
The first step, obviously, is to remove the old extruder. I removed the top bar from the printer to do this, and raised the print beam as high as I could; otherwise the Z axis screw tended to get in the way. Simply unplug the extruder motor then undo the four screws on the old extruder. Hold on to the motor as you undo the last one, or it’ll just fall off. Then remove the drive gear from the motor axle. It’s held on with two grub screws, and once they’re loosened it comes off easily. Once you have the unit stripped down, give everything a wipe; mine was covered in tiny fragments of filament.
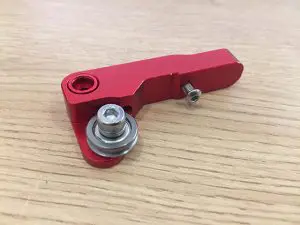
Now find the new drive gear in the kit, and fit it to the motor. Don’t tighten the screws at this stage; you’ll want to adjust it for height later. Next, assemble the feed arm. Find the M4x8mm screw – it’s the shortest and fattest – the idler wheel and the M4 spring washer. Put the washer onto the screw, follow it with the idler then screw it onto the flat lug on the feed arm. Find the dome-headed M3x10mm screw and screw that into the face of the arm. Then put the arm aside.
Screw the M3.5x14mm tensioning screw into the side of the extruder base. You’ll need to screw it in all the way for now; otherwise it blocks one of the mounting screws. Screw the Bowden tube coupling to the base too.
Next, find the countersunk M3x10mm screw. Put the extruder base on top of the mount with the coupling facing inwards towards the print area, hold the motor against the underside of the mount, and line up the holes. Then use the countersunk screw to hold it all together. The two remaining M3x10mm screws go in either side of the coupling. Once they’re in, slacken the tensioning screw off about halfway.
There’s a metal sleeve that looks like a cartoon top hat; slip that over the end of the tensioning screw. Now drop the red alloy spacer into the big hole in the feed arm and fit the M3.5x18mm screw through it.
The next bit’s a little fiddly unless you have three hands, which I assume you don’t. Then again neither do I, and I managed, so it’s doable. Anyway, lay the feed arm on the extruder base. Fit the ends of the spring over the sleeve on the tensioning screw and the screw on the face of the feed arm. Now try to get the 18mm screw through the hole in the extruder base, through the mount and into the hole in the motor casing. You can’t. The only way to do it is to depress the feed arm as if you’re feeding filament. One hand to do that, another hand to hold the other end in position over the screw hole, and a third hand to turn the Allen key. See the problem? The trick is to use one finger to hold the screw end of the arm, and a second to depress the other end. It’s easier than it sounds, honest.
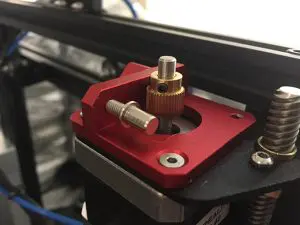
With the 18mm screw tightened down, and the feed arm depressed, lift the drive gear so the idler and the middle of the toothed section are the same height, and tighten the grub screws. Now all that’s left is to replace the top bar on the printer frame, plug the Bowden cable into the coupling and reconnect the power cable to the motor. I added a PETG knob that I printed last week, so I can manually wind the filament in and out if necessary.
The Verdict
I haven’t actually printed anything with the new improved extruder upgrade yet, so I can’t tell you how it works, but it’s obviously a very solid and durable piece of kit and won’t suffer erosion from filament. Can it be assembled in two minutes like the makers claim? No; it took me about half an hour. I suppose I could have managed in two minutes if I just assembled the extruder without fitting it to the printer, but that would be a little pointless. On the other hand it was easy to install apart from some minor fiddling with the feed arm, and it’s hard to see how Redrex could have made that any simpler.


Leave a comment
You must be logged in to post a comment.