
3D Printer Troubleshooting Special

In my recent review of SUNLU’s rainbow filament I mentioned that, while I was printing a large vase, it failed near the end of the two-day print run. I 3D printed a ring to finish off the top rim, but I was also curious about why the print had failed. So I decided to do a little experiment.
It’s been a while since I printed anything tall enough to bump up against the Ender 3’s 250mm height limit, and the printer has changed a bit since then. Was something I’d done to it causing issues with very high prints? I decided to print something very high and find out. I didn’t want to waste filament printing something elaborate that was quite likely to fail, so I designed a simple tube, 20mm in diameter and 250mm tall. It wouldn’t use much filament and Cura said it would print in less than four hours, so I loaded it into the Ender and hit start.
So What Happened?
Predictably, most of the tube printed out just fine. I looked in on it occasionally and the print was running smoothly. However, about 15 minutes before it was due to finish I heard the dreaded knocking sound that told me the extruder was struggling. Usually this means the filament has picked up too much moisture, is swelling as it passes into the heat block and the extruder motor can’t force it down into the nozzle. This time it meant something different.
When I looked at the printer the two filament guides I’d installed were jammed up against each other and, instead of helping the filament feed smoothly, they were now putting a lot of resistance on it. The extruder couldn’t overcome that resistance, which was producing the knocking sound. I’d also fitted a knob to the extruder axle so I could retract it manually, and that was occasionally bumping against the guides too, but I don’t think it was contributing to the problem.
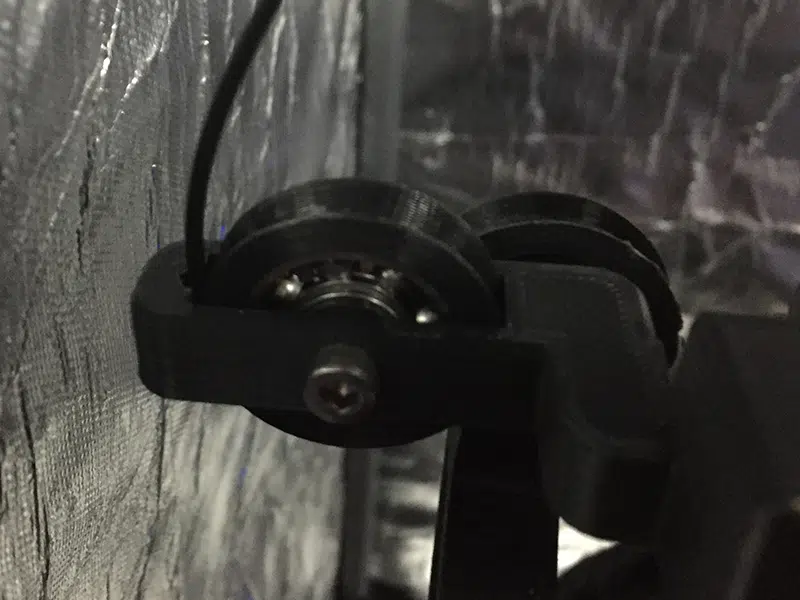
This definitely was a problem. The extruder was totally overwhelmed and had essentially stopped feeding filament. I’d be very surprised is this wasn’t what happened to the vase, too.
Anyway, it’s not hard to work out where I went wrong. The Ender 3 has had lots of bits added. Many of these came from Thingiverse, but they were all the products of different designers and hadn’t necessarily been designed to work together. Then there are a few that I designed myself; while I tried to make these compatible with the others, I may have overlooked a couple of details.
Overall I’m very happy with the modifications I’ve made to our 3D printer, and the filament guides are particularly handy. Filament can be tricky stuff, but my two little rollers ensure it always runs smoothly, doesn’t loop itself round anything and comes into the extruder at the right angle. Unless, of course, I try to print anything more than about 8.5 inches high.
So now what? Well, the next step is to redesign the top filament guide so that even with a full-height print it’s above the bottom guide and more in line with it. That way the filament path will still work even when the head is at the top of the build volume. I’ll also make a new knob for the extruder shaft, probably a smaller-diameter one that won’t interfere with anything else.
The key to avoiding this sort of problem is to thoroughly test any modifications as you make them. What I should have done, once I’d fitted the top filament guide, is run the print head all the way up the Z axis to make sure no bits were getting jammed. Well, I’ll know that next time!


Leave a comment
You must be logged in to post a comment.