Ultimaker Cura Slicing Software
We’ve looked at a few 3D printers on here, and talked about different types of filament. We’ve also discussed some tips to improve the quality of your prints. There’s another vital element in producing good 3D-printed objects, though – your slicing software.
Your slicer is what turns 3D models into a series of commands your printer can understand. It basically analyses the model then writes a path for your printer’s head that will recreate that model as a printed object. Obviously it’s pretty important.
Some printers come with their own proprietary slicing software, but if yours doesn’t – or it does but you don’t like it – there’s no shortage of options to choose from, many of them free. One of them stands out, though – Cura.
What Is It?
Cura is a very flexible slicer. It was developed by Ultimaker for their own range of printers, but the code is open-source and profiles for hundreds of other printers have been added, including all the popular models. Unless your printer is really obscure or you designed it yourself, it’ll work with Cura out of the box.
If you’re new to 3D printing, Cura is ideal because it’s extremely easy to use. If you’re an experienced printer, Cura is ideal because it has lots of features and produces good results. Whoever you are, a nice bonus of Cura is that it’s free. It’s now bundled with many printers, or you can just download it from Ultimaker.
How Does It Work?
When you install Cura you’ll need to set up an Ultimaker account. This is actually quite handy, because it gives you access to all their online forums as well as getting you updates to the software whenever they come out. Then, when you launch it for the first time, it will ask for the printer you plan to use so it can load the right profile.
When the workspace opens you’ll find a nice visual representation of your printer’s bed, right down to the logo, and a wireframe outline of the build volume. This is surrounded by all the basic tools you need to prepare a model for printing. You can move, scale or rotate the model, change settings like layer thickness and infill percentage, set up rafts or supports, and preview the printing process layer by layer to help spot any potential glitches. For most users, and especially beginners, everything you need is right there on the screen.
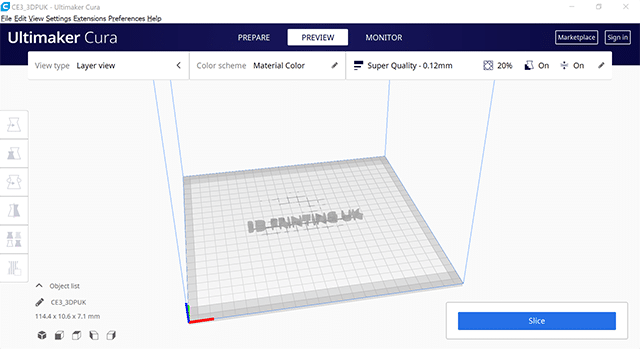
For more advanced users, though, Cura has a huge list of additional settings that can be tweaked – more than 400 of them, letting you adjust the print in incredible detail. I’ve been through the full list a few times and honestly haven’t spotted anything that should be there but isn’t.
Being open-source, Cura also has a large and growing range of plug-ins. These include add-ons to help it work with professional CAD software, like SolidWorks and Autodesk; for example, the SolidWorks plug-in lets you create an object, then export it to Cura with a single click. On the other hand I use FreeCAD and Blender, and exporting from them is no trouble either. Cura supports a decent array of file formats on top of the usual .stl, so you should have no trouble getting your models into it.
The Verdict
Unless you have some very esoteric requirements, Cura is an ideal slicer. The price can’t be beaten, it has a clean, simple interface, and it’s highly flexible. Its capabilities scale well as you gain experience, but the basic settings are enough to get you printing very quickly even as a complete beginner. If you haven’t tried it yet, you should definitely give this slicing software a go.




Leave a comment
You must be logged in to post a comment.