Slice by slice – how 3D printing works
MODERN 3D PRINTERS BREAK A COMPLEX TASK INTO A SERIES OF SIMPLE ONES
Watching a 3D printer in action is a fascinating sight. At first it’s impossible to tell what the finished object is going to be, but as the print head builds up layer after layer the shape slowly becomes obvious until the finished piece is revealed. It seems almost magical – a solid object being created apparently out of thin air, with just the moving print head to bring in into existence. In fact the concept is very simple; it’s just getting it to work that’s difficult. Want to know how 3D printing works? Then read on.
3D printing is what’s known as additive manufacturing. Creating a 3D model in design software, then sending it to a computer-controlled tool to be produced, is nothing new; it’s been a standard industrial technique for decades. But up until recently these machines worked by starting with a blank piece of the raw material and cutting it down into the final product. A 3D printer does it the other way around, by starting with nothing and adding material to create whatever you want.
A printer can create a solid object by many methods, including using a laser to fuse powdered metal, but the most common is Fusion Deposition Modelling – laying down layers of molten material on top of each other. If you’ve used an inkjet printer you’ll know how it builds up a 2D image line by line; a 3D printer does the same thing with an extra dimension added.
There are two stages in creating an object this way. The first is done in software. It starts with a model of the object, created in a 3D design application. This is run through a software slicer, which does just what the name says – it cuts the model into slices, each slice as thick as the resolution of the printer. For a normal printer the resolution is the number of dots per inch it can print; in a 3D printer dots per inch makes up two of its three dimensions, and the third is the thickness of layer it can create. Thinner layers mean a more detailed and smoother object.
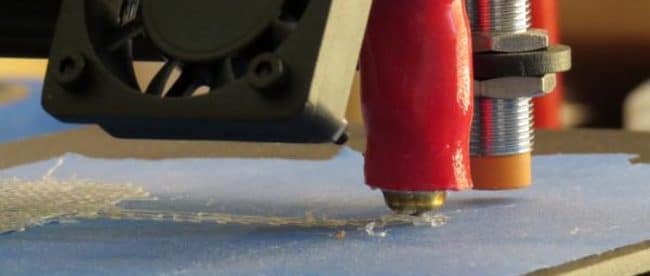
Now the prepared slices are sent, one after another, to the printer. The printer itself has two main elements. One is the platform, where objects are created. The other is the print head. The head has a fine nozzle that can place precise drops of material on the platform. The material comes as a cord that’s fed into the head from a spool. Inside the head is a heating element that melts it so it can be squirted onto the platform. It works just like a tiny hot glue gun. When the material lands on the platform it fuses to what’s already there, then cools and solidifies. Each slice is printed as a 2D object; then, when it’s done, the printer recycles and begins the next slice on top of it.
An inkjet prints in two dimensions but the print head moves in only one of them – it shuttles back and forth along its rail. The second dimension is handled by the paper, which rolls forward one line at a time. Adding a third dimension can be handled the same way – the print head can stay at the same height and move in two dimensions, while the platform drops slightly for each new layer. There are different ways to distribute the dimensions between platform and head though. In some printers the head moves along a rail just line an inkjet, while the platform shuttles at 90 degrees to the rail as well as lowering between layers. The platform can even do all the movement, while the head stays still.
Starting a new layer has its own challenges. The new material laid down by the head needs to be hot enough to fuse with the cooled material from the last layer. If it’s not the finished object will be very weak, and prone to shearing at the join between layers.
Fused Deposition Modelling is the simplest way to run a 3D printer, and almost all home models use it. There are other solutions, but if you’re interested in trying 3D printing at home you’re best starting with an FDM design. It’s the most economical method and doesn’t waste a lot of material, and the results can be excellent. We’ll look at some more methods in the future but now you know how the most common 3D printing works.



Leave a comment
You must be logged in to post a comment.