
Keeping Your 3D Prints Watertight

I love 3D printing, but it can be frustrating sometimes. There’s always more to learn, and I’m pretty good at having to learn it unexpectedly when all I want is to load the file and get the printer running. That’s how I was feeling this weekend, anyway. I’d designed a clipboard holder for a project I was working on, and I just wanted to get the thing printed so I could check it did what I need it to. Cura had other ideas.
Is It Watertight?
As soon as I loaded the model into Cura, up flashed a dialogue box warning me that the model wasn’t watertight and might not print properly. I managed to resist the urge to throw things at the screen, even though I was pretty annoyed. Watertight? Who cares if it’s watertight? It’s a clipboard holder, not a submarine.
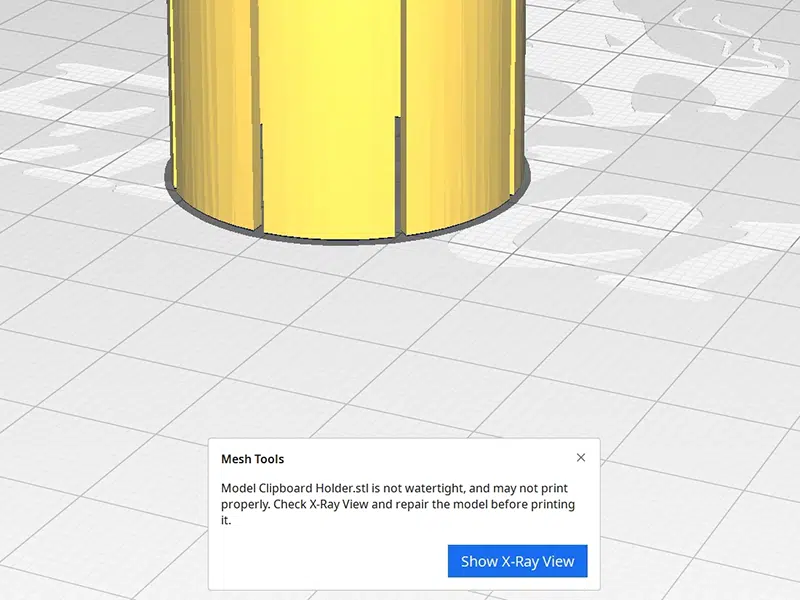
Of course Cura doesn’t mean literally watertight. In terms of a 3D model, “watertight” is all about the geometry of the shapes it’s built from and how they intersect. It’s surprisingly easy to accidentally create a model that looks fine in your design app but that couldn’t actually exist in the real world. Some apps are better than others for this. I mostly work in FreeCAD, and the models it creates doesn’t throw up watertightness errors too often, but when it does I have to figure out what’s wrong and then fix it.
Most watertightness issues are caused by surfaces inside your model that ended up there because of how you built it up from simpler shapes. That doesn’t sound like it makes a lot of sense; after all, if the offending surfaces are inside, won’t they just disappear among the infill? No, apparently not.
The issue is how Cura analyses the structure of the model. Basically, it starts at the outside and works its way in, counting surfaces as it goes. This tells it what parts of the model should contain infill and which should be hollow. Unfortunately, it can get confused if it finds different numbers of surfaces in different places – and when Cura gets confused, you get a watertightness error. Keep your designs as clean as possible, and don’t over-complicate them with more shapes than you really need.
What Can You Do About It?
In the worst case you might need to go back into your 3D design package and fix whatever problem Cura has identified. To get an idea of what might be wrong, use the X-ray view; the warning dialogue has a handy button that will switch to this view, or you can find it in the View type drop-down menu in the top left of Cura. In X-ray view everything should be blue. If any surfaces are coloured red, there’s your problem.
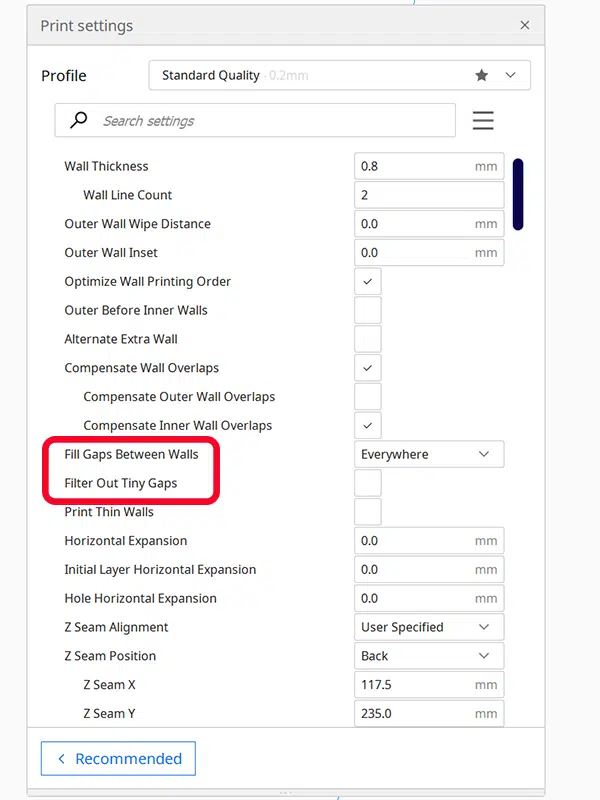
In my case there weren’t any red bits, which was a bit of a puzzle, but anyway I just took a chance and hit the slice button anyway. Luckily it worked out fine – possibly thanks to a couple of the Cura slicer’s handy options. If you look through Quora’s extensive options menu you’ll find a few related to walls; Fill Gap Between Walls and Filter Out Tiny Gaps will solve a large percentage of issues without having to do any work on your model, so if Cura says your design is leaking make sure those are checked. They usually work, and that can save you a lot of tinkering!


Leave a comment
You must be logged in to post a comment.